
These photos were actually taken back in March, St. Patrick's Day to be precise. The last day I remember being truly happy. It was before lockdown and I was off work and had a lovely relaxing morning. We went for a walk around an empty Dublin caressing my still pregnant belly and talking about the future as we always did on our day off walks. I wasn't going to even bother writing a post on this look but I figured it was the last makeup look I did when Milo was still alive and for some reason that made me feel compelled to share it.
I had purchased the Bodyography glitter pigment in the shade Prism in November and hadn't gotten around to creating a look with it yet. Since it's a duo chrome green/brown I thought St Patrick's day would be the perfect opportunity to try it out properly. I decided to create a green and gold look so I added another Bodyography pigment called Bubbly in the centre of my eyelid for an extra pop, almost like a spotlight eye. The base is just a mid-toned matte brown swept across the socket of my eyelid and Prism blended out all across my lid. I mostly use my fingers to apply these glitter pigments as it gives the best intensity of colour. I then take a densely packed synthetic brush and blend out the edges carefully before using fluffier brush if I feel I need to finish any blending.
If you're looking for natural and radiant skin, I highly recommend this base combination- Glossier Futuredew and Clarins Skin Illusion Foundation. Obviously it depends on your skin type, if you have more oily skin this combination might be too much but I have combination skin and I just apply Futuredew where I want the most shine and then I'll smooth whatever is left over onto the rest of my face. I think I've said it before here but any time I look back at photos of my past makeup looks I'm always the happiest with how my skin looks when I'm wearing Skin Illusion foundation. What I really love about it is that it just evens out your skin tone and gives such a natural and radiant finish to your skin. Because the texture is quite light and easy to blend, it's the perfect foundation for layering with the likes of Glossier Futuredew as it doesn't feel like I'm wearing lots of makeup. It just makes your skin look hydrated and fresh and doesn't mask your natural complexion. My friend Céline is also a huge fan of this foundation, so please go and have a look at it on her if you want to see it on a darker skin tone than mine.
I do have dark circles too so I apply a small amount of concealer only where I need it, mainly in my inner corners and under my eyes closer to my nose. I like to use a hydrating concealer that has great coverage (my favourite is the bareMinerals Complete Coverage Serum Concealer) and I find this technique means that you can apply very little concealer so that your base still looks natural and seamless. I like for my concealer to be the same shade as my foundation rather than lighter. However If I do find I want a touch more brightness I'll add the smallest amount of YSL Touche Éclat Illuminating Pen just to attract some light to that area.


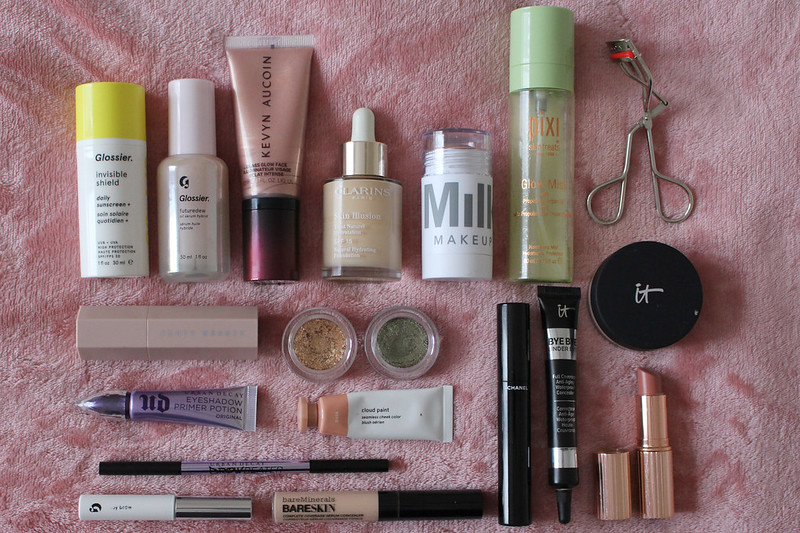


Glossier Invisible Shield Daily Sunscreen
*Glossier Futuredew Oil Serum Hybrid
*Clarins Skin Illusion Foundation (101 Linen)
Milk Makeup Matte Bronzer (Baked)
Fenty Beauty Match Stix Matte Skinstick (Amber)
*IT Cosmetics Bye Bye Under Eye Concealer (Light/Fair)
*bareMinerals bareSkin Complete Coverage Serum Concealer (Fair)
*Urban Decay Brow Beater (Dark Brown)
Glossier Boy Brow (Brown)
*Urban Decay Eyeshadow Primer Potion
Bodyography Glitter Pigment (Prism and Bubbly)
Kevyn Aucoin Eyelash Curler
Chanel Beauty Le Volume de Chanel Mascara
Glossier Cloud Paint (Dusk)
Kevyn Aucoin Glass Glow Face (Prism Rose)
*IT Cosmetics Bye Bye Pores Powder
Pixi Glow Mist
Charlotte Tilbury K.I.S.S.I.N.G. Lipstick (Bitch Perfect)
I kept the rest of my makeup quite neutral, applying my favourite neutral blush shade, Glossier Cloud Paint in Dusk on my cheeks and Charlotte Tilbury Bitch Perfect lipstick which is a great warm nude shade for fair skin tones. I also applied some of the Kevyn Aucoin Glass Glow Face in Prism Rose on my cheeks for an added sheen to my skin. The more I use this the more I love it. I think this plus Futuredew plus Skin Illusion is the holy trinity for super radiant skin. Obviously it completely depends on how you have prepped you skin for makeup too. In case you don't follow me on Instagram, I created a story highlight on my page called "Glowy Skin" and featured the skincare and makeup products I use to get a super radiant base. If you like my style of makeup be sure to have a look at it and if there's any looks you'd like to see me try or if there is any of my previous looks you would like to watch me go through again, please do let me know.
I hope everyone is doing as well as they can be in this strange period of time we are living in. Try and be kind to yourself and those around you and I hope no matter what you're going through you can still find the joy in the small pleasures of life.
Emma x
*PR Samples
**Glossier products are affiliate links, if you choose to shop via those links I will receive a small percentage of the sale but it won't cost you anything extra.

No comments:
Post a Comment
Thank you for taking the time to leave a comment. I appreciate every single one!